Thursday, August 22, 2013

Free Sewing Pattern: Tahiti Halter Neck Top Sewing Tutorial

Tahiti Halter Neck Free Sewing Pattern
tahiti halter neck top pattern


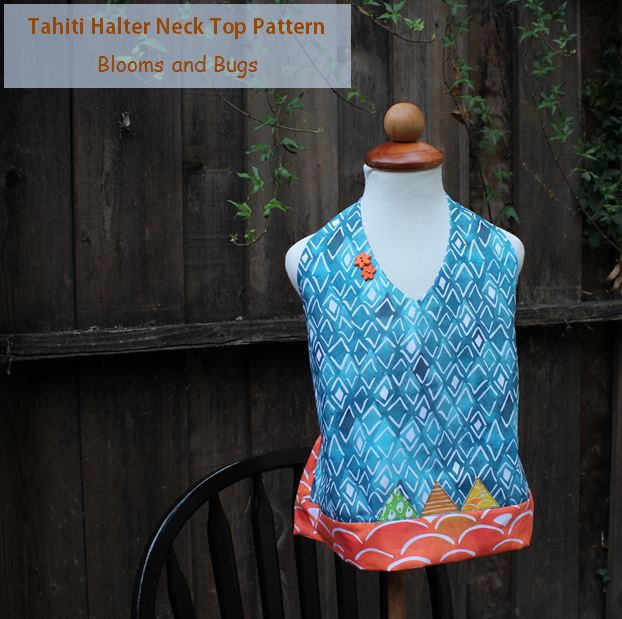
I first found out about Modern Yardage from this Shirred Summer dress tutorial on Make It and Love It. "What a cool concept!" I remember thinking. Basically Modern Yardage has fabrics in a lot of prints and designs and you could order whichever fabric you like and they will print on demand. Yes! you can pick however much you like in whichever print you like and also you can pick the scale you want the print in ( they have three options) and they will print it and ship it to you. So you can rest assured that your favorite print will never go out of stock. What a novel idea!

So I read about them on Make It and Love It and asked them if they would like to sponsor fabric for a halter neck top I wanted to sew. They said yes and soon I had on my hands fabric from this beautiful Earth To Sky collection from Katie Schrader. The thing that struck me most about this collection was its earthiness, the colors reminded me of pottery and bricks being made of dirt. Very different from florals or paisley I typically like but beautiful nonetheless. I whipped up this halterneck the first chance I got.

Here is how I went about it ( and you can too)

Skill Level:
Intermediate

Time:
1  hour

Supplies:
3 fat quarters
1 button
For embellishment:
Decorative Buttons
Pellon Wonder Under

Pattern: 
Download the four-page Tahiti Halter Neck Pattern ( size 3T-5T). Print it on A4 (8.5 X 11 inches) paper with margins set to 0 and Portrait Orientation
Please note that this pattern has a lot of flexibility in terms of sizing. You could make it wider by adding more of shirred portion in the back. So the same pattern will work from 3 to 5 years size.

Seam Allowance:
1/4 inch unless otherwise stated.

Techniques Used:
Sewing buttonholes, Shirring, Appliques, Making and sewing Bias Tapes

Construction:

halterneck top sewing tutorial
1. Cut a rectangle 13 inch ( length) X 15 inch( width) from the fat quarter picked for the back. Fold it in half on 13 inch side.

Free halter neck pattern
2. Fill bobbin with elastic thread and sew 4 to 5 rows of shirring about 3/8 inch apart. Don't worry if doesn't seem to gather much. Once you are done sewing steam iron the piece well. this will help it gather well. Here is a great tutorial on shirring from Make It and Love It.
Depending on how much the piece gets shirred we may need to use the whole piece or a part of it. To determine this either measure the child's chest and subtract the front bodice width from it. The measurement you are left with + 1 inch is the required width of shirred piece.
However, if you can its best to not cut it just yet and measure it on the child once its partially sewn. That is the best way to check and adjust the fit. You need to have the child nearby in order to do this though. I will show you how to do it in step 6.

cut out the pattern pieces
3. Cut out the front pieces using the pattern. Cut one from the main fabric and one from lining.

sew with right sides together
4. Place the main fabric and lining right sides together. Sew along the armholes and keep going over the shoulder straps, neckline all the way to the end of another armhole. Leave the sides and bottom raw.
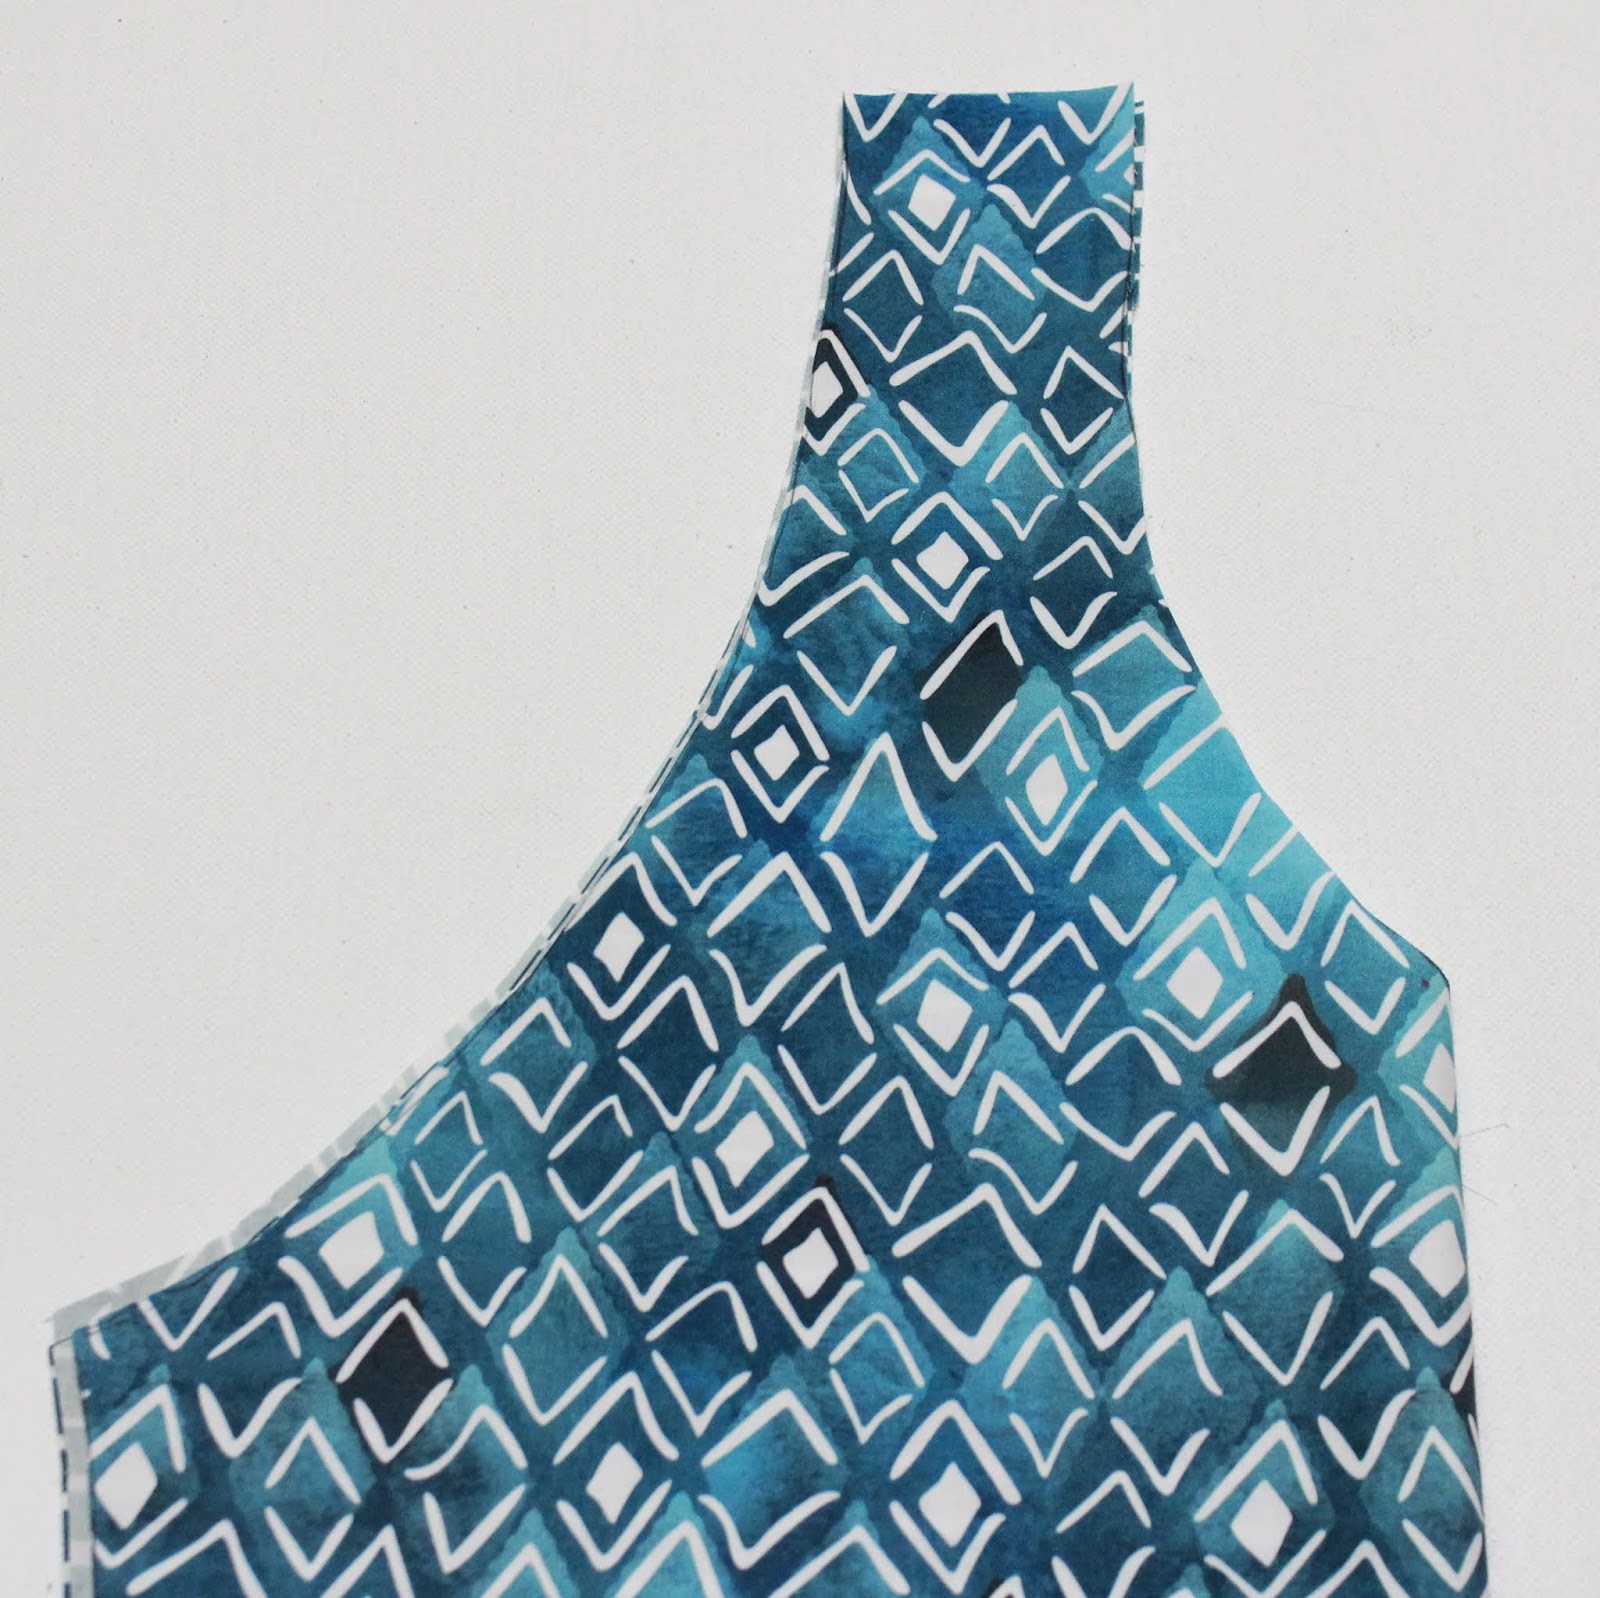
Snip notches all along the curves  to get a crisp finish along the edges when you turn it out.

sandwich the back between the front pieces
5. Open the front piece on the sides and slide the shirred piece in between such that right side of shirred piece is together with main fabric of bodice. Cover with lining fabric and sew along the sides. Note that the front pieces are curved along the sides, so while sewing the back pieces just follow the curve of the front, we will cut out any excess fabric later on.

sew along the sides
6. Stretch the other end of the shirred fabric to line up with the other side and sandwich the shirred piece the same way as we did in Step 5. Keep the back piece width to whatever measurement you arrived at in Step 2.
The rest of the piece will be hanging out on one side and that is fine, we will take care of it later once we have tried the top on the child.

Sewing tutorial - halter neck top
7. Turn the top out and iron. Its looking like the halter neck now. Now try this on the child and see if the back is a snug fit. Ideally it should be snug without being uncomfortable. If it is a good fit then go ahead and cut off the excess shirred piece that was hanging on one side, if not then unpick the side seam of step 6 and adjust the back width as needed.

making wide bias tape
8. Cut out a 3.5 inch wide fabric strip from the back fabric and fold it like a bias tape, only in this case the raw edges don't get folded all the way to the center. I kept mine at 1/4 inch on one side and 3/8 inch on the other. Basically what we need is a wide bias tape without sacrificing a lot of fabric. So the precise width of the fold doesn't matter, just fold a little bit so you can sew it. Here is a detailed tutorial on making and sewing bias tapes from MADE.

sewing the bias tape
9. Sew the bias tape from Step 8, all along the bottom of the top ( including the back).

sew button and buttonhole
 10. Sew a cute button and a buttonhole on the shoulder straps for closure. Buttonhole and Button sewing tutorial on MADE.

I was almost done with the top at this point...but then I noticed this on the fabric

applique tutorial
The fabric I had received had this swatch of the collection in all colorways. So cute, it was just begging to be added into the top. I obliged.
Here is a detailed applique tutorial from my earlier posts.

appliquing with wonder-under
11. I cut out a rectangle of Pellon's Wonder Under and ironed it on the back of swatch piece.

How to sew appliques
12. Then I cut out these triangles from the swatch and peeled off the backings. I ironed them in place along the bias tape slightly off center to the right.

applique tutorial

13. I set stitch length to smallest, set the machine speed to lowest and sew a seam along all the triangles with black thread.
I also added a couple of cute buttons near the neck.


And...woohoo! Who is ready for last bit of summer fun..in a cute halter neck?


Pin It

Friday, August 16, 2013

Reader Appreciation Month: You Made It!

Knotted Baby Hats, from Buffaloes and Butterfly Wings

Its amazing to see that such a simple project received so much attention from readers. But then we all can use easy DIY baby gifts, right?

Amy of Buffaloes and Butterfly Wings created these cute knotted hats while waiting for her baby. Here is the tutorial for Knotted Baby Hat.

August is Readers Appreciation Month on Blooms And Bugs. You Made It series is part of readers appreciation posts where I put you and your projects in the spotlight.
Have you made anything with Blooms And Bugs Free Tutorials and Patterns? Email me a pic at bloomsandbugs [at gmail   along with your blog/website or anything you would like me to give a shout out to, and I will feature it in one of the You Made It editions.


Pin It

Friday, August 9, 2013

Rader Appreciation Month: You Made It!

layered skirt with pickups
Springy Ruched Skirt, Peaches And Bees

Annie from Peaches And Bees made this super cute Springy Ruched Skirt for her little girl based on the Claire Skirt Tutorial. And boy did she made it better! I love all the tulle peeking out from the inner layer. Simply beautiful! Go to Peaches And Bees to get more details and also see the super cute model donning this skirt.
Well Done Annie.
August is Readers Appreciation Month on Blooms And Bugs. You Made It series is part of readers appreciation posts where I put you and your projects in the spotlight.
Have you made anything with Blooms And Bugs Free Tutorials and Patterns? Email me a pic at bloomsandbugs [at gmail   along with your blog/website or anything you would like me to give a shout out to, and I will feature it in one of the You Made It editions.
Other posts in the series:
You Made It (1): One Shoulder Ruffle Top

Pin It

Monday, August 5, 2013

Reader Spotlight: Jenya Thompson from While She was Sleeping

Reader Appreciation Month: Reader Spotlight: Jenya Thompson of While She Was Sleeping

August is Reader Appreciation Month here at Blooms And Bugs. Throughout this month, I will be showcasing your projects, spot-lighting my readers, answering your questions...basically its all about you. Actually, its always all about you but this month I'm just being a bit more vocal about it, because without you, my wonderful readers this won't be a very fun place to hang out.

Today, I'm focusing the spotlight on one of my amazing readers - Jenya Thompson. Jenya is what I can call an early adopter of Blooms And Bugs. She was commenting on my posts, liking them on facebook and craftsy at a time when I didn't use to get many ( any ) comments. If you are a blogger like me you would understand how encouraging and inspiring it is to hear back from your readers. One way communication is never a lot of fun and it was really great to have Jenya stop by and tell me when I posted something good or when I wrote something about sewing that resonated with her.

Newborn Gift Set, While She Was Sleeping

Jenya lives in Australia with her husband and her beautiful daughter and sews and sells kids clothes made with the natural fibers on her facebook page While She Was Sleeping. I have always loved looking at her creations on facebook, so I wasn't at all surprised when she emailed me one day and said that she was thinking of starting a sewing blog. In fact, I think she should have done that a long time ago.


Bluebell Reversible Skirt Sewing Tutorial
Bluebell Skirt Sewing Tutorial, While She Was Sleeping

So these days Jenya blogs at While She Was Sleeping and in addition to selling clothes, she also posts great sewing tutorials like this Electronics Case Tutorial ( on my To Do list for a long time) and this cute Bluebell Skirt Tutorial. She is kind of a perfectionist when it comes to sewing tutorials and she makes sure everything is laid out clearly before she publishes them. I actually try to remember her when I write my tutorials these days because she does such a great job at them.

electronics case DIY
Electronics Case DIY, While She Was Sleeping

Great work Jenya, Love your blog and love that you take time to read Blooms And Bugs and leave your feedback.


Pin It

Friday, August 2, 2013

Reader Appreciation Month: You made it!

Readers Sewing PRoject: One Shoulder Dress
sewing a one shoulder dress


MJ emailed a couple of weeks back with this cute little one shoulder top she had made for her grand-daughter based on coral reef dress tutorial. I think it turned out fabulous and I just love that doggy and sheep print. Such fun.
She also mentioned that her grand-daughter loves to wear it too.


Here is the part that really touched me though. MJ made 26...yes 26 knotted hats for charity. I'm so moved by her act of kindness and I'm so happy that my patterns are being used for such noble causes.

Here is what she wrote on my facebook page:

"Hello, I was inspired by your tutorial and pattern of knotted baby hats. I have used your pattern to make hats for newborn babies as 26 acts of kindness, in honor of each of the victims of Sandy Hook Elementary tragedy. I recycled black and orange and white OK State t-shirts for the OSU medical center in Tulsa Oklahoma. I hope you are OK with this. MJ"

Ok? Are you kidding me? I was speechless. And honored. Thanks so much MJ.

 I also wanted to add that if in the future any of you decides to do it, do drop me a note as well. I would love to join you in your efforts. Maybe we could do it as a sew-along on this very blog.

August is Readers Appreciation Month on Blooms And Bugs. You Made It series is part of readers appreciation posts where I put you and your projects in the spotlight.
Have you made anything with Blooms And Bugs Free Tutorials and Patterns? Email me a pic at bloomsandbugs [at gmail   along with your blog/website or anything you would like me to give a shout out to, and I will feature it in one of the You Made It editions.

Pin It

Thursday, August 1, 2013

August is reader appreciation month at Blooms And Bugs

Hello There!
Just popped in to say that August is the reader appreciation here at Blooms And Bugs. What that means is that I'm going to talk a lot about my wonderful readers here, and show off your projects that you have made with Blooms And Bugs tutorials, publish answers to questions that I get frequently and last but not the least, do a couple of giveaways from my personal stash.
Why? Because I could write all I want..but without you this would be a really lonely corner of the web, your presence is what makes it happening and also what inspires me to sew and write.
Stay tuned for more...

PS: Some of you have kindly shared with me the project you have made with my tutorials, but if you haven't do send me a couple of pics of your projects, along with your blog or webpage address. We all want to look at them.


Pin It