Thursday, January 31, 2013

Basic winter clothes refashioned from Sweater

Blooms And Bugs: Winter Clothes Refashion from Adult Sweaters

When Old Navy had its 50% off Clearance sale last year, I stocked up on some bright colored sweaters ( 100% cotton). This winter I finally put them to good use.
Here is a pair of pullover and leggings I made from one XXL sized men's sweater. Little monkey picked the iron-on appliques from my stash.

 Winter basics for $4...yes please!


Pin It

Friday, January 18, 2013

What makes it all worth it!

I always thought that the biggest reward of sewing and blogging was to sew something for our kids and make them smile. Whenever I see pictures of kids wearing something that one of you made with my designs, I can't help but smile.
However, all that changed yesterday when I received this message in my facebook account from MJ:

Hello, I was inspired by your tutorial and pattern of knotted baby hats. I have used your pattern to make hats for newborn babies as 26 acts of kindness, in honor of each of the victims of Sandy Hook Elementary tragedy. I recycled black and orange and white OK State t-shirts for the OSU medical center in Tulsa Oklahoma. I hope you are OK with this. MJ

I am touched beyond words. Although it was MJ who took the initiative and blessed others with her gift of sewing and generosity, I feel honored that the "Knotted baby hat design" was part of her acts of kindness. Thank you so much MJ. The world is so much better because of people like you.

Pin It

Saturday, January 12, 2013

Ruffled Romper Tutorial

Blooms And Bugs: Ruffled Romper Free Sewing Tutorial
ruffled romper sewing tutorial
This is a tutorial I posted on UCreate a couple of months ago. Re-posting it here in case you missed it first time around.
I have always loved rompers on kids. This is one garment that stays snug on them and still allows them all the freedom to run and play. Making one from Ruffle Fabric just kicks the style factor a couple notches higher plus the fabric is super stretchy and a knit aka no hemming or finishing the edges ( Yaay!!). I just can't get over how beautiful it looks on the little girl here.  So lets get started on making one in your favorite color. 

Supplies:
  • Ruffle Fabric - half yard - for 2T size
  • Elastic thread
  • Grosgrain Ribbon in matching color - 1.5 yard
Approximate time: 2 hours
Complexity level: Beginner to Intermediate
Techniques used: Shirring, Making buttonholes
Approximate Cost: $12
Measurements:
  • Measure child around the  widest part of her body ( usually belly or butt): lets call this W: W1 = W+3 inches
  • Measure the length from chest to crotch: Lets call this L. L1 = L+6 inches
  • Measure child around her chest: Lets call this C. C1= C- 3 inches 
Construction:

1. Cut a ruffle fabric piece of width W1 X  length L1

shirring the ruffle fabric
2. Now shir along the top W1 edge. Pin or baste the ruffles down so they don't get in your way while you shir. Keep shirring until the W1 edge becomes equal to C1 in width. Here is a great  tutorial on shirring.

sew along the length right sides together
3. Sew together the L1 sides ( right sides together) but stop 3 inches before the end.

cut a slit in to make legs
4. Rotate the seam along L1 such that it sits at the center of the back.Now cut a 3 inch slit starting at the lower edge of the front center. It should be equal and aligned to the un-stitched part you left in step above.


shir the leg openings
5. Now shir each side of these slits about 1 inch above the lower edge. Sew about 3-4 rows of shirring. Align the front and back parts along the slit. Pin and sew ( right sides together) to make leg openings.

Adding shoulder straps
6. Cut two ribbon pieces 20 inches long each. Cut two pieces of ruffle fabrics. 3 inches long and 10 inches wide.

how to sew shoulder straps
7. Sew one end of each ribbon 2.5 inches apart at the center front.

8. Now make two buttonholes 2.5 inches apart at the center back. ( I avoided making these buttonholes for a while because I wasn't sure how they will turn out on ruffle fabric, along with all the shirring. Let me tell you, these were the easiest buttonholes to make. Here is a tutorial on buttonholes, but if you read your machine's manual you can learn to make buttonholes very easily by yourself. So don't worry. Go right ahead and make those buttonholes.) Thread the other ends of both ribbons through these buttonholes in a Cris-cross fashion.
At this point its best to try the romper on the child and mark the point on ribbon where it falls on the shoulder.

tying the ribbon at the back
 9. Cinch and sew the center of these pieces at the points on the shoulder that you had marked. If you can't measure the child, then my rule of thumb is to sew it 4 inches from the front.


ruffled romper sewing tutorial
10. Put it on your child, tie a knot at the back and smile! Isn't she the cutest thing ever?

how to make ruffled romper

Thursday, January 10, 2013

Raglan Tshirt Pattern ( 2T) and Tutorial

Blooms And Bugs: Raglan shirt free pdf pattern
raglan tshirt pattern
Here is a really fun boy print from Clothworks. Its called City Streets by Jamie Wood. When I received the fabric, the first thing that came to my mind was Raglan Tshirts. However, all the TShirts need to have some stretch in them which is not present in cotton wovens. I kept thinking about how I could use the prints I liked so much and still have the flexibility of TShirts. Finally I found the answer, I just need to mix in some knits and we will be good to go. So I made one Raglan Tee, and then I made some more, and I love them all.
Estimated time: 1 hour  
Complexity: Beginner  
Supplies: Half yard City Streets Print from Clothworks ( SKU- Y0980-31) Half yard Knit fabric in coordinating color  
Pattern: Download the pdf pattern for Raglan Tshirt ( size -2T). Print on 8.5 inch X11 inch paper with no margin.
pattern for sewing raglan tshirts
The pattern should look like this once you put the pages together. Sewing margin : 3/8 inch  
Construction:
 
cutting out the tshirt pattern
1. Cut out the pattern pieces

sewing the raglan tee
2. Sleeves and body are sewn together just like in peasant dresses tutorial ( look at the step 2).

cutting out the cuff and neck bands
3. Cut out the neckbands and cuffs for the sleeves. The rule of thumb I use is that they are two-third+1 inch of the length we need to cover and 3 inches wide.

sewing the bands
4. Sew the shorter ends( right sides together)

fold the bands in half
5. Fold in half onto themselves.

pin and sew the cuffs
6. Align the raw edges of the band and the sleeves, pin and sew.

attaching cuffs to the sleeves
7. Turn out!

attaching the neck band to teh Tshirt
8. Do the same for the neckline.
9. I had also added a knit fabric band at the bottom of the first shirt I made. For that I took a 5 inch wide band about two inch shorter than the hem length and sew it at the hem in the same way as we did the cuffs and neck band. In the second shirt I just folded the hemline twice to hem it. You could do whichever way you like better but if you are planning on adding a band at the bottom, remove the bottom 2 inches from the pattern to allow for the extra length.

Raglan Tee sewing tutorial
Rinse and repeat
Check out my Free Sewing Tutorials at Blooms And Bugs for more sewing patterns and ideas for your kids and yourself.
Pin It

Monday, January 7, 2013

Free Sewing Pattern and Tutorial: Pumpkin Pie Dress

Blooms And Bugs: Pumpkin Pie Dress Free Sewing Pattern
pumpkin pie dress pattern
Photo by Ami Mathur Photography

This is a tutorial I posted for Clothworks blog. Reposting it here in case you missed it first time around.
Ever since I have drafted a peasant dress pattern, I have been playing around with different design elements to make most of it. Here is a cute dress made with mixing a bunch of Clothworks collections ( Suzette, Picnic Pals, Safari Sweet) and adding in some fun details like ruffles, belt, easy appliques etc.

Supplies:
Coordinating fabrics in different prints
I chose the following fabrics:
Suzette for bodice and ruffle at the hem - half yard
Picnic Pals for Sleeves and belt fabric - half yard
Safari Sweet for skirt  - half yard
Orange felt fabric
Approximate time: 2 hours
Skill Level: Beginner
Pattern:
Print out the 3 page pdf pattern for Pumpkin Pie Dress on 8.5 X 11 inch paper with margins set to zero.


free dress pdf pattern
Here is how your patterns will look when you assemble them

Sewing Margin: 3/8 inch until otherwise specified

Construction:

Sewing the bodice
how to sew bodice for peasant dress

This dress builds up on the peasant dress pattern we published earlier. So, I'm skipping over the details of how to assemble the bodice and finish the neckline and sleeves. Its exactly same as Peasant Dress here except that here I didn't shir the sleeves. You could shir or leave the sleeves as is depending upon your preference.

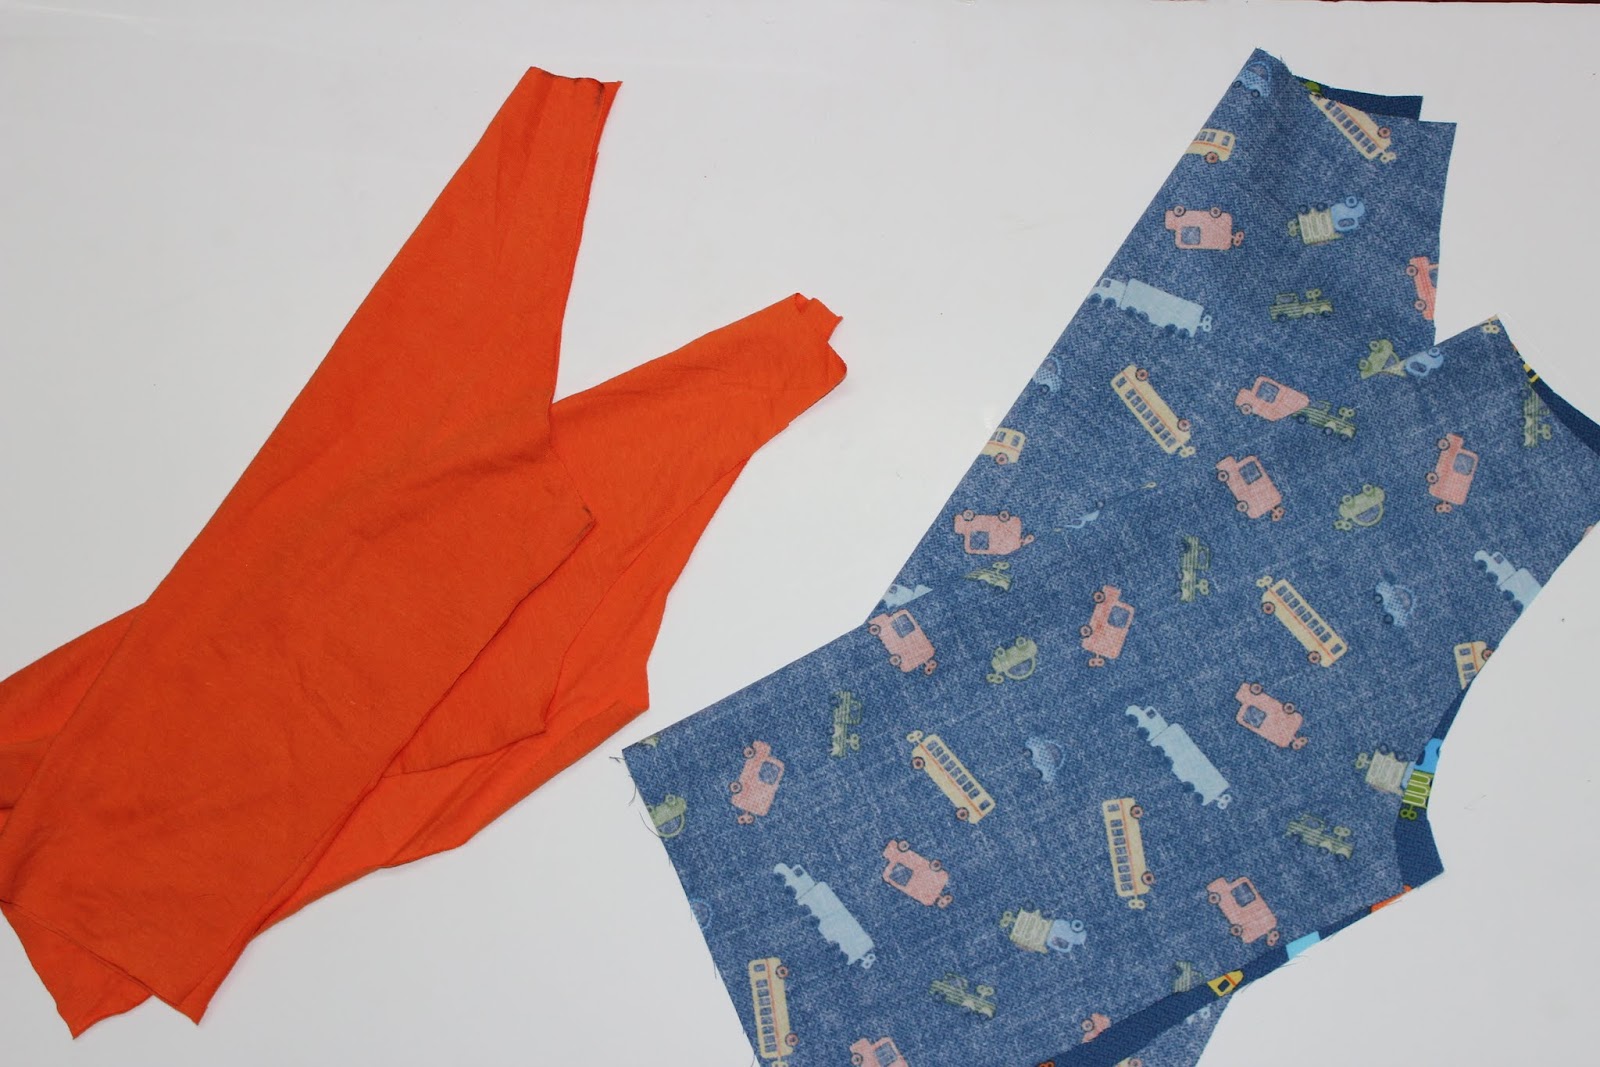
Cut out the pattern pieces. Sew the sleeves and bodice together like the peasant dress here.

Sewing the skirt
Cut a piece of fabric 16 inches ( length) X 40 inches( width). Sew the 16 inches sides together ( right sides together).

Sew two seams along one of the raw 40 inches edge. Pull the bobbin thread to gather the fabric. Gather until it becomes equal to the bodice. Sew it to the bodice ( Right Sides Together)

Attaching the ruffle at the hem
sewing a ruffle
Cut two strips 3 inches long and 40 inches wide. Sew the shorter ends together to join them and form a big circle.

Fold both raw edges quarter inch onto the wrong side twice.

how to sew a ruffle
Set your machine tension on high and stitch length on max and set the speed on max. Sew a seam about half inch below the edge. This will ruffle the fabric automatically. Once you are done you could even out the ruffles by hand and adjust them to fit the hem of the dress.

how to make ruffled hem
Fold the dress hem quarter inch onto itself twice. Sew the ruffle you just made about an inch above the hem.

Making belt:

Cut two strips of 40 inches width. One 2.5 inches long and another 4 inches wide.
 Sew the 40 inches sides to each other on both raw edges.
belt sewing tutorial
Center the smaller strip on the bigger strip. Now sew a seam at one of the shorter ends. Snip corners. Turn out.
 Here is my detailed tutorial on sewing belts.

sewing two colored belt
Here is how the belt will look after turning out.

dress sewing tutorial
Iron. Tuck the raw ends inside. Iron again. Sew a seam to close the end.

belt sewing tutorial
Here is the finished belt.

free pdf aewing pattern
Center the belt over the seam joining bodice and skirt. Sew two seams overlapping with the seam joining both belt fabrics. This seams will be sewn only in the front.

pumpkin appliques how to
Cut out few pumpkins in different sizes from felt pieces. Use a black embroidery thread to sew running stitches on the pumpkins for decoration.

felt pumpkin appliques
You can now attach pumpkins by hand-sewing them to the dress or by machine sewing. By using felt we skip over the steps using interfacing or finishing the raw edges. I have already washed the dress a couple of times and the appliques are holding up just fine.

peasant dress sewing pattern
Photo by Ami Mathur Photography

Just add a baby!


Pin It

Friday, January 4, 2013

Reversible Pants Revisited

Blooms And Bugs: Sewing Reversible Pants
Made these pants and revisited my Reversible Pants Tutorial. This time I used Dana's pants pattern. Its always fun to make these pants, they work really well in cooler moths.
I used a baby wale from Joann for the outer layer and a printed interlock for the inner layer. Ummm..soft.

I also found a better way to close the opening at the top. More on that later...once I make another pair and take more pics.


Pin It

Tuesday, January 1, 2013

Sewing Tutorial: Red Ruffled Romper

Free Sewing Tutorial: Ruffle Fabric Romper

ruffle romper tutorial

I was sent some yummy ruffled fabric by rufflefabric.com, it is just so gorgeous and pretty that I wanted to make tons of things with it. After going back and forth many times, I finally settled on this ruffled romper. Its so easy to make using the ruffle fabric. I whipped it up in about an hour.

Here's what you need:

Supplies:
Ruffle Fabric - half yard ( actually it is so wide that it will make two of medium sized rompers for 2T size)
Quarter inch wide elastic in matching colors
Snaps or buttons for the closure at the bottom

Measurement:Measure the child from chest to about 4 inch below crotch. lets call it L1.
Measure the child at the all around at the belly . Lets call it W1.
Skill Level: Beginner
Time: One hour
Cost: $10

Construction:

Cut a rectangle L1 X W1.

Sew the sides along L1. Rotate the seam such that it is in the center of back.

Cut a 2 inch arch at the center bottom of the romper. I actually freehanded it, but you could always mark a 2 inch mark and make an arch using a bowl or any circular object. Save the scraps, we are going to use them later.

Turn a little fabric inside on the arch and sew a seam.

Cut 10 inches long pieces of elastic and sew it 2-3 inches apart at the front top center criss-cross these strips at the back and sew.

The scraps that we saved earlier will be used now. Cut them in circular shapes. You don't need to be precise here. Just eyeball the rough shape.

Layer these circles one over the other and hand-sew at the center on the shoulder strap.

Make a bow with the grosgrain ribbon and hand-sew it at the back of the romper.

Notice that I never said a word about hemming or finishing raw seams. So here is the thing with ruffle fabric - It's a knit, it doesn't fray, so it doesn't need to be hemmed.


Pin It